
In this blog post we are going to create a way for users to log into an app from scratch.
As all apps begin in the terminal. Type into the terminal: rails new login_app
You will see once you type that in and press “enter” that a lot of files were created
Then in your terminal you will want to go into this new folder that you created. Type in your terminal: “cd login_app”
Then if you type “ls” you will see all the new files and folders that were created. 
Then if you type in”rails s”, which is short for “rails server” you will see the following: 
See where it says “Rails 4.1.4 application starting in development” this means that your app is now running on you local server and if you type in “localhost:3000” into your browser you will see your app! 
Here is our app! Right now it doesn’t look like much, because we have applied any views or code in general, so lets fix that!
If you had started your server and want to stop it. To stop the server press “control + c” (this is for Mac users)
Then if you are using “Sublime Text” as your text editor in the terminal there is a nice shortcut to open up the application in the text editor. Type: subl .
Then in “Sublime” you should see the following: 
These are all the files and folders that we received when we typed “rails new login_app”
The first file I want to look at is the “Gemfile” where all the gems are that are going to be used for this app. You can find this in the main directory of your app. 
Notice towards the bottom of the document there is a commented out gem called “bcrypt”. This is an extremely important gem! You never want to store passwords in plain text in your database! The reason you never want to is because incase someone breaks into your database all the usernames and passwords can be taken. If people use the same username and password for multiple accounts then you have also compromised there information on those other sites. What “bcrypt” does is encrypt the users passwords so that what gets stored in the database will not look like what the user has entered. This is a very popular gem to use for passwords, incase you want to learn more about this gem here is a nice resource: codahale/bcrypt-ruby
To uncomment out something in Ruby just remove the “#” sign. After you do that then you should see the text in color! 
Whenever you add or adjust a gem in your gem file you have to go back to the terminal to the root of your application and type in: “bundle install”
After you run bundle install your should see: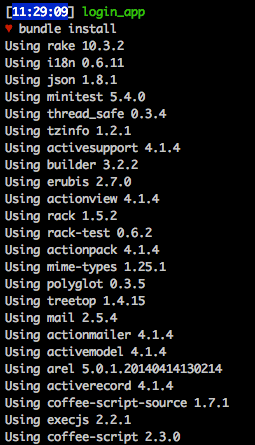
You will know if the bundle was successful if you see this at the bottom: 
Now that we are set up with the “bcrypt” gem which will store passwords in our database safely, lets set up our database!
In the terminal type in: “rails g migration Users”
The “g” is short for generate
Lets go back to Sublime and see what this created! 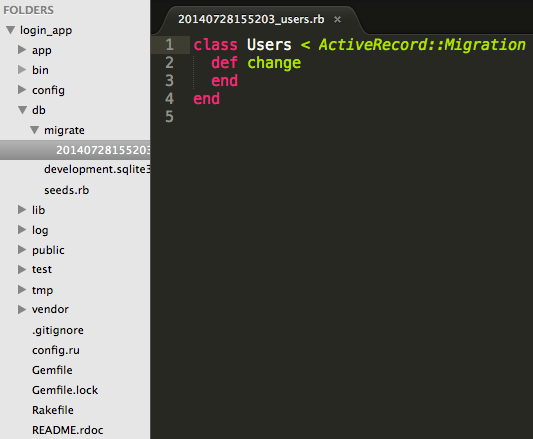
- In “db”, then in the folder “migrate” you will see there is a new file there with the file name “20140728155203_users.rb”. The numbers that are in the beginning of the file name is a timestamp and that is followed by an underscore then our table name, “users”. All migrations will have a timestamp at the beginning because all migration names have to be unique. You can not have two migrations with the same name and they also have to run in the order which they were created. This is something nice that Ruby does for us so when we run our migrations they will run in order and we don’t have to worry about numbering them ourselves.
- Lets create the table for our users.
class Users < ActiveRecord::Migration def change create_table "users" do |t| t.string "email" t.string "password_digest" t.timestamps end end end - Above we are saying that we would like to create a table with the name of “users” and it is going to have two columns. The first column is “email” that will take a string input and the second is “password_digest” that also takes a string input. The “t.timestamps” is going to give us “created_at” and “updated_at” columns in our database.
- Lets run that migration! In the terminal type: “rake db:migrate”
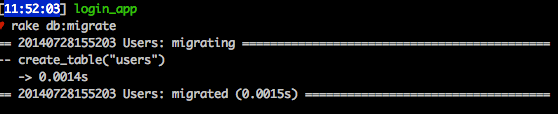
- You will know if the migration was successful if you see something like the above. The migration will affect our “schema.rb” file. If you open up that file you should see the following:

- Notice that we don’t see the “t.timestamp” instead we see the “created_at” and “updated_at”.
- Next lets add some controllers to our application. Controllers are going to determine what a user sees. What if a user does not enter in an email address when signing up? What happens if the user types the confirmation password incorrectly? All that logic will be written inside the controllers.
- We are going to the following controllers for our app, a “users” controller, “sessions” controller, and “login” controller. We can create these by typing in two commands in the terminal.
- Type into the terminal: rails g controller nameOfController
- When you type those commands in you should see:

- When you go back to Sublime you should see three new files created in the “app/controllers” directory. When you open up these two files you will see that each file has a class that inherits from “ApplicationController”. It also has created three folders that correspond to the controllers.
- We can now create some “actions” for our controllers.
- Looking at our user_controller.rb file lets create some actions which are really just Ruby methods.
class UsersController < ApplicationController

     def new
          @user = User.new
     end

     def create
          @user = User.new(user_params)

          if @user.save
                session[:user_id] = @user.id
                redirect_to login_index_path, success: 'Thanks for signing up!'
          else
                flash.now[:error] = "Uh oh something went wrong"
                render "new"
          end
     end

private
     def user_params
          params.require(:user).permit(:email, :password, :password_confirmation)
     end

end
- Above we have our “UsersController” with two actions. First is is a new user is being created with the “new” action. We are creating a new instance of our “User” class and saving it to an instance variable “@user”.
- The next action we have is “create”. The first line is that we are creating a new instance of user and we are passing in “user_params” from the bottom of the file. These are called “strong params”. In the latest version of Ruby you have to use strong params. If you want to know more about strong params here is a good resource: rubyonrails.org
- Then we go into an if/else statement. If the user is saved then we are going to redirect them to the “login_index_path” with a message displaying “Thanks for sign up!”
- If the user is not saved then we are going to display an error message “Uh oh something went wrong” and render the “new” page.
- Sessions Controller
class SessionsController < ApplicationController

     def create
          user = User.find_by(email: params[:email])
          if user && user.authenticate(params[:password])
               session[:user_id] = user.id
               flash[:success] = "Thanks for logging in!"
               redirect_to login_index_path
          else
               flash[:error] = "something went wrong..."
               render action: 'new'
          end
     end

     def destroy
         session[:user_id] = nil
         redirect_to log_in_path, :notice => "Logged Out"
     end

end
- The sessions controller is going to work with if a user has already created then they will be able to go to a page where they only have to enter in their email address and password.
- The create action is going to see if we can find the user in our database by looking for a matching email.
- Then we have an if/else statement. This is saying if the user object that we found and the password matches then we are going to set the session id to equal the user’s id. This is how it is possible to make sure that when a user signs in that they can only access their account information. We will also show them a flash message saying “Thanks for logging in” and redirecting them to the index page.
- If they didn’t put in the correct information then we are going to show them a flash message of “something went wrong…” and render the “new” page.
- When a user wants to sign out we are going to use the “destroy” action which will set the “session[:user_id]” to nil. Then they get redirected back to the login page.
- Here is the application controller:
class ApplicationController < ActionController::Base
     # Prevent CSRF attacks by raising an exception.
     # For APIs, you may want to use :null_session instead.
     protect_from_forgery with: :exception
     add_flash_types :success

     def require_user
          if current_user
               true
          else
               redirect_to log_in_path, notice: "You must be logged in"
          end
      end

      helper_method :current_user

      private

      def current_user
           @current_user ||= User.find(session[:user_id]) if session[:user_id]
      end
end
- Here we are defining what a “current_user” is.
- Here is the login controller:
class LoginController < ApplicationController
     before_action :require_user
end
- Above we are saying that the user has to be logged onto the site before they get access to other pages.
- We need to now tell our application what to do when a user goes to a certain url. For example if a user goes to our “log_in” path our app is going to read that as “sessions#new” (a new users session), but all the user will see is “log_in” in the url. Here are some basic routes for our app:
Rails.application.routes.draw do

     root :to => "users#new"
     get "log_out" => 'sessions#destroy', :as => "log_out"
     get "log_in" => 'sessions#new', :as => "log_in"
     get "sign_up" => 'users#new', :as => "sign_up"

     resources :users
     resources :sessions
     resources :login
     resources :user_sessions, only: [:new, :create]

end
- You can think of the routes as a map for our app.
- So we have our routes set up, but they don’t really lead anywhere yet. We didn’t work with the views! The four views we are going to create are: new.html.erb (for sessions), new.html.erb (for users), application.html.erb (for menu bar and static parts of the pages), and an index.html.erb for when the user logs into the app (will be in views/login directory).
- This is for our new.html.erb file for the sessions. This is creating a new users session when they have already created an account.
<h1>Log In</h1>

<%= form_tag sessions_path do %>
      <p>
      <%= label_tag :email %><br />
      <%= text_field_tag :email, params[:email] %>
      </p>
      <p>
      <%= label_tag :password, "password" %><br />
      <%= password_field_tag :password %>
      </p>
      <p class="button"><%= submit_tag %></p>
<% end %>
- This is going to be for our new.html.erb file for users. Generating a new user.
<h1>Sign Up!</h1>

<%= form_for @user do |f| %>
     <% if @user.errors.any? %>
     <div class="error_message">
          <h2>Form is invalid</h2>
          <ul>
               <% for message in @user.errors.full_messages %>
                    <li><%= message %></li>
               <% end %>
          </ul>
     </div>
<% end %>
<p>
     <%= f.label :email %><br />
     <%= f.text_field :email %>
</p>
<p>
     <%= f.label :password %><br />
     <%= f.password_field :password %>
</p>
<p>
     <%= f.label :password_confirmation %><br />
     <%= f.password_field :password_confirmation %>
</p>
<p class="button"><%= f.submit %></p>
<% end %>
- Here is the application.html.erb file:
</pre>
<pre><!DOCTYPE html>
<html>
     <head>
          <title>Example logging in!</title>
          <%= stylesheet_link_tag 'application', media: 'all', 'data-turbolinks-track' => true %>
          <%= javascript_include_tag 'application', 'data-turbolinks-track' => true %>
          <%= csrf_meta_tags %>
     </head>
     <body>
          <h1>This is from the application.html.erb file!!! Yaaa!</h1></pre>
<pre>          <div id="user_nav">
               <% if current_user %>
                    <p>Logged in as: <%= current_user.email %></p>
                    <%= link_to "Log out", log_out_path %>
               <% else %>
                    <%= link_to "Sign up", sign_up_path %> or
                    <%= link_to "Log in", log_in_path %>
               <% end %>
          </div></pre>
<pre>     <% flash.each do |name, msg| %>
          <%= content_tag :div, msg, :id => "flash_#{name}" %>
     <% end %>

     <%= yield %></pre>
<pre>     </body>
</html></pre>
<pre>
- Lastly we need our index.html.erb file which will be in our views/login directory. A user will only be able to see this page if they are logged in.
<h1>Welcome to our Login App</h1>
<div>
     <p>This is where all the amazing information would go!</p>
</div>
- Almost done!! We want to make sure that the user enters in their email address in a good format. What if a user entered in an email address incorrectly? We want a way to tell them they need to correct what they entered. We do this with the “user.rb” file that is in our app/models directory.
class User < ActiveRecord::Base
     has_secure_password
     validates :email, presence: true,
                       uniqueness: true,
                       format: {
                                with: /\A[A-Za-z0-9._%+-]+@[A-Za-z0-9\.-]+\.[A-Za-z]+\Z/
                       }
     before_save :downcase_email
     def downcase_email
          self.email = email.downcase
     end
end
- Above we are validating the input for the email a user enters. We are also running a method that will downcase an email address if a user enters in email that has capital letters in it.
Now when you go to your terminal and start your rails server again (rails s), go to your browser and type in “localhost:3000”. You should now see the follow!!

You can now have people register for your app and log into their account!
