Inspiration

There are several website and other resources that I really love that inspire me whenever I go to them. The first one by far is Creative Bloq. They have interviews with people from a wide range of fields from designers, to artist, programmers, graphic designer and so many other professions. I can go on this site to read recommendations for books to read or find some amazing free tutorials to look at. They also show amazing short animations such as this one that was made by  Maki Yoshikura.

You can read more about the story behind the animation one the site as well.

If I ever want to look at different color palette my favorite site is Colour Lovers.

Screen Shot 2014-07-18 at 1.26.15 AM

For some fun inspiration these music videos comes to mind:


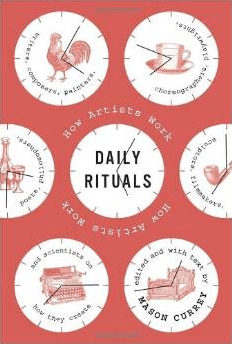
One of my favorite books is “And So It Goes: Kurt Vonnegut: A Life” by Charles J. Shields. I have read a lot of Kurt Vonnegut’s books, but never knew that much about the author until I was given this book as a Christmas gift one year. It was such an amazing book I read in a week. It was great to read about how he went through being a struggling artist to becoming a renowned author. Which brings me to my second favorite book called “Daily Rituals: How Artist Work” by Mason Currey. This was another really quick read. They are a collection of short stories about the daily lives of different creative people, mostly artist and authors, but Benjamin Franklin is in there too! The collection is about how all these people create different routines in order to do the things that they love the most. Whether it is finding time to write while maintaining a full time job or having a schedule that is best for their work flow.

Screen Shot 2014-07-18 at 1.47.38 AM     Screen Shot 2014-07-18 at 8.53.22 AM

The las thing I want to share is this short film about…inspiration!

Devise Gem

username_password

Gems are a great way to extend the functionality of your program. One gem that we are going to look at today is the “Devise” gem. If you have an application that will have users that will be able to log into your application there has to be a way to authenticate that user. You need to make sure that the username and the password match.

Here is how you use Devise in your Rails application.

  1.  Go to your Gemfile and write: gem ‘Devise’
  2. Then in your command line type in: bundle install
  3. Then type in the terminal: rails generate devise:install
  4. In your terminal there should have appeared a list of steps that you will now have to do in your applications files: Screen Shot 2014-07-02 at 7.21.27 AM
    1. In your “environment” folder there is a “development.rb” file you have will have to paste the following line to the bottom of your file, but before the keyword “end”:
      config.action_mailer.default_url_options = { :host => 'localhost:3000' }


      Also notice that in your “environment” folder there are two other files. These files are for different stages of your app. One will be for development, one for production and one for testing.

    2. At the bottom of you “production.rb” file you will have to paste in the following:
      config.action_mailer.default_url_options = { :host => 'yourappsname.com' }
    3. Next you are going to have to define the root URL. Go to your “config” folder then in the “routes.rb” file. At the top of the file type the following:
      root "pages#home"
    4. Now we are going to have to set up our flash messages which will appear on the screen when our users either login successful or login incorrectly. In your “views” folder then in your “application.html.erb” file type the following:
      <% flash.each do |name, msg| %>
      <%= content_tag(:div, msg, class: "alert alert-info") %>
      <% end %>
    5. Go to your “application.rb” file and inside your mode as the very last line type in the following:
      config.assets.initialize_on_precompile = false

      This is going to be required later on when we push to Heroku.

    6. In the terminal enter in the following line: rails generate devise:views
      1. The above is going to create a lot of different folders and files for you which you will be able to see when you open the application in your text editor.

In the next post I will show you how to start setting up users using Devise!

Screen Shot 2014-07-02 at 8.59.25 AM

Resources:

1. Treehouse Blog: 10 Must Have Gems

2. Ruby for Newbies: Working with Gems

3. GitHub: Devise

file structure of Sinatra

files 
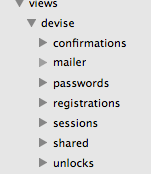
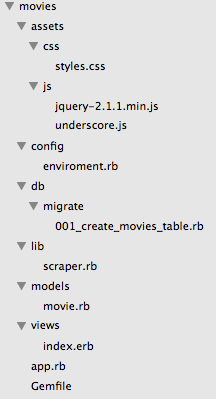
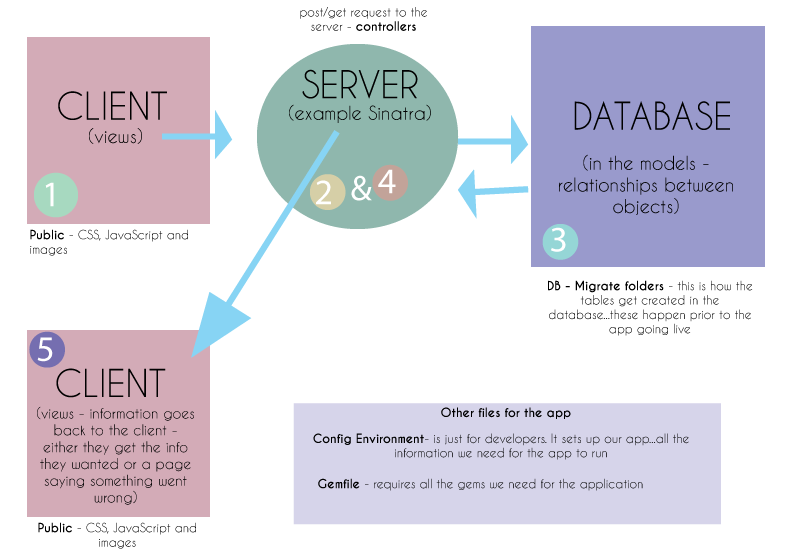
Sinatra is a library that makes web application and we are going to look at how the folders/files are assembled.

Screen Shot 2014-06-26 at 8.56.41 AM

  • All of our files for our application are in the ‘movies’ folder
  • ‘assets’ holds all of our files that work with visual aspects from our ‘views’ folder. CSS and JavaScript are here each in their own folder.
  • ‘config’ holds the ‘environment.rb’ file. This file sets up our connection to our database. In this example we are going to be working with ActiveRecord.
  • ‘db’ holds our ‘migration’ folder which will hold all our migration files. Migrations are how we edit our database. This is going to be where we create our table that will hold data.
  • ‘lib’ will hold all our the helper files for our application.
  • ‘models’ folder is where we have a ‘movie.rb’ file. This name for this file should be singular and should represent the data that you are working with. I choose the name ‘movie’ because that is the information we are going to be working with.
  • ‘views’ this is where all the files are going to go that the user will be able to see. In this folder we see an ‘index.erb’ file which stands for ’embedded Ruby’. This is going to be an HTML5 document with Ruby code to make our pages dynamic.
  • ‘app.rb’ file is where you are going to have all the routes for the application. All the GET and POST requests will be placed in here. This file determines what the user will see when they go to a URL.
  • ‘Gemfile’ is a file that we are going to require all our gems for the entire application. This is going to let us require all the gems in one file rather than having to require all the gems in multiple files.

Now that we have the file structure for our application how do these files communicate with each other? Before the app gets run, we have to do is set up our database. This is done through migrations, which we have in the ‘db/migrate’ directory. Inside this directory is our ‘001_create_movies_table.rb’ file. (Note: it is important that you label your migration files numerically because they will be run in numeric order.)


class CreateMoviesTable < ActiveRecord::Migration

def change
     create_table :movies do |t|
          t.string :name
          t.string :date
          t.text :description
     end
end

end

Now we are going to look at the ‘lib’ directory, which holds files that will be helpful to your application. Inside our ‘lib’ directory we are going to run our scraper file. This is going to gather all the data for our application and store it in the database. When the user goes to view our application the data that we gathered and stored in the database is now going to be able to view.

After the ‘scraper.rb’ file is run we will look at the ‘app.rb’ file, found in the main directory. In this file we will see all of the routes for the application.

Here is what our ‘app.rb’ file looks like:


require '.config/environment'

class MovieApplication < Sinatra::Base
register Sinatra::Reloader
register Sinatra::ActiveRecordExtension

set :public_folder, "#{__dir__}/assests"

get '/' do
@movies = Movie.all
erb :index
end

get '/movies.json' do
content_type "text/json"
Movie.all.to_json
end

get '/movie/:id.json' do
content_type "text/json"
Movie.find(params["id"]).to_json
end

run!

end

We also see at the top of the ‘app.rb’ file that it is requiring ‘.config/environment’. We can find the ‘environment.rb’ in the ‘config’ directory. Here we are requiring ‘bundler’ which will give us the correct version of the gems that we are using in the application. In this file we are also establishing our connection to the server. For this app we are using SQLite and we are calling our database ‘scraped_movies’. At the bottom of this file we are requiring all of our ‘models’ and everything in our ‘lib’ directory. This file is going to require our ‘bundler’ and establish the connection to the database for our app. Below is an example of the ‘environment.rb’ file:


require 'bundler'

Bundler.require :default

ActiveRecord::Base.establish_connection(
adapter: "sqlite3",
database: "db/scraped_movies")

require_all "models"
require_all "lib"

At the bottom of our ‘environment.rb’ file we can see that it is requiring all of our ‘models’ and everything in our ‘lib’ directory. The models directory is where we create classes for the data that we are working with. The classes will inherit from ‘ActiveRecord::Base’. It is here that we are able to validate if data is being passed into the database as the correct datatype. We can also specify relationships between models. For example if we wanted to have a relationship between movies and actors we could write the following:


class Movie < ActiveRecord::Base

has_many :actors

end

Now if the user were to go to the route we have created in our ‘app.rb’ they will be able to see our page! If the first URL they visit is with our route ‘/’ the user is going to see our ‘index.erb’ file. This file is found in our ‘views’ folder. Once this file is loaded it is also going to load the CSS and the JavaScript files that are linked to that page. The CSS and JavaScript files can be found in the ‘assests/ccs’ and ‘assests/js’ directories. Here is an illustration I drew that illustrates what is happening above:

client_server_blog

Intro to sql – linking tables

lock

In order to get access to data that is stored in a database, we need to be able to communicate with the database. Data is stored in the database in tables. The way that you retrieve, change, create, or delete data can be done through SQL. A great way to organize data is often splitting up data into categories and then putting each category into its own table. Once each category has its own table, then you can “link” each table together in a separate table.

Here we are going to create one table for actors and one table for movies. By creating individual tables instead of one big table, our information will be more organized. We can create a third table that will link the actor to the movie that they were in.

First lets create the actors table:


CREATE TABLE actors (

id SERIAL PRIMARY KEY,

first_name TEXT,

last_name TEXT,

age INTEGER

);

  • “CREATE TABLE” is a key phrase that will allow us to make our table.
  • “actors” is going to be the name of our table
  • Everything in between the parentheses will be information for our table. When we set up the table we are going to set up all the columns. Above we have all the column names and we are specifying what kind of data the column will have.
  •  ” id SERIAL PRIMARY KEY” – This is going to create an id column that will have a datatype of “SERIAL PRIMARY KEY”. This data type means that the id column is going to have an auto generated id number. You will not have to manually enter in an id number every time you create a new actor.
  • “first_name” and “last_name” – These are going to be text columns.
  • “age” – This column will hold only numbers.

Next lets add some information to the table we just created.


INSERT INTO actors (first_name, last_name, age)
     VALUES ('Vincent', 'Kartheiser', 35);
INSERT INTO actors (first_name, last_name, age)
     VALUES ('Jon', 'Hamm', 43);
INSERT INTO actors (first_name, last_name, age)
     VALUES ('John', 'Slattery', 51);

Now lets make a table for “movies”:


CREATE TABLE movies (

id SERIAL PRIMARY KEY,

movie_title TEXT,

year_released INTEGER,

genre TEXT

);

Then we add all the information:


INSERT INTO movies (movie_title, year_released, genre)
     VALUES ('Rango', 2011, 'Comedy');
INSERT INTO movies (movie_title, year_released, genre)
     VALUES ('The Town', 2010, 'Drama');
INSERT INTO movies (movie_title, year_released, genre)
     VALUES ('Iron Man 2', 2010, 'Sci-Fi');

movie_table

Next we have to create a table that will hold the information we want to have from the two different tables. Below is a table that will link our “actors” table and our “movies” table.


CREATE TABLE actors_movies (
     actors_id INTEGER,
     movies_id INTEGER
);

The last step is to insert the actors id and movies id into the “actors_movies” table.


INSERT INTO actors_movies (actors_id, movies_id) VALUES (1, 1);
INSERT INTO actors_movies (actors_id, movies_id) VALUES (2, 2);
INSERT INTO actors_movies (actors_id, movies_id) VALUES (3, 3);

Above we are linking the two tables together by referencing their id columns.

  • INSERT INTO actors_movies (actors_id, movies_id) VALUES (1, 1);
  • Our values above are going to be the id number of our actors and the id number of movie that they were in.

The “actors_movies” table will now look like the table below. Now the actors are linked to the movies that they are in.

objects in javascript

books

Objects in JavaScript are a lot like hashes in Ruby. They store information using keys and values.

Here is an object in JavaScript:


var cafe = {

name: "La Colombe",

location: "New York City"

}

Here is a hash in Ruby:


school = {
     "name" => "Flatiron",
     "location" => "Brooklyn"
}

The way that you would access the values are even very similar.

Here is how you would access a value in JavaScript:


cafe.name;

Here is how you would access a value in Ruby:


school["name"]

Both will give you the values associated with those keys. Let’s add some more information to our JavaScript object:


cafe.food = "sandwiches";

This would add a key of “food” and a value of “sandwiches” to our cafe object.

What if we wanted to create objects for a lot of different cafes in JavaScript? That would be a lot of writing and not very DRY (don’t repeat yourself). When you know that you are going to be creating a lot of objects that will have the same attributes you should use a constructor function.  Here is an example of what a constructor function looks like:

function Cafe(name, location){
     this.name = name;
     this.location = location;
}

In the code above we have the following:

  • “function” – This is a JavaScript keyword identifying the rest of the code as a function.
  • “Cafe” – The name of our function and since this is uppercase we know that this is specifically a constructor function.
  • (name, location) – These are arguments to the function. You can think of these as place holders for when you pass in the actual names for the instance you are creating.
  • {} – These will hold all the code for the function.
  • “this.name = name;” – The word “this” is a keyword in JavaScript. When you create an instance of the function “this” it is going to refer to that particular instance. You are then setting “this.name” to “name” which is going to be the value of what you pass into the function.

Here is how you would create a new Cafe instance:


var fresco = new Cafe("Fresco", "2nd Avenue");

The result of above will create a fresco object.  To see the new object you created you can type:

console.log(fresco);

The above will print to the screen:

{name: "Fresco",
location: "2nd Avenue"
}

If you had to create a lot of cafes this would save you a lot of time!